Digital Examination with Inspera - information for students
Inspera examination is a system used at Karolinska Institutet for written digital exams on campus and remote written digital exams. On this page you will find information and resources which you can use to help prepare for the exam.
Register to your exam
Registration for exams will usually occur on Ladok (if another procedure is used, you will be informed). Information on how to use Ladok as a student can be found here. Make sure to register to the exam in good time.
Registration for exams in examination halls
The following applies to registration for exams in examination halls from the spring semester 2026.
- You must register for the exam, in Ladok, no later than ten calendar days before the exam date, read information about registration in Canvas or on the course website.
- You must also be registered on the current course for the exam. If you only have the exam from a previous course you do not need to be registered on the course.
- Your studentaccount must be active at the time for the exam.
- Prepare by reading all information on the site Exams in examination halls.
Students who are not registered to the exam are not allowed to write at the time of the exam.
Canvas
All course and programme websites (go to the programme websites for programcourses)
Preparing before the examination
Do you know your KI username and password? Is it still valid?
To be able to take your Inspera exam in an exam hall (and in many cases remotely) you will need your KI username and password. We recommend that you check that your login works on Insperas login page before you come to the exam hall.
Note: You risk not being able to complete your examination if you do not know your KI username and current password when you take your exam. We can not guarantee that you will receive IT support on site during your exam regarding your login information.
- If you need to reset your password, you can follow the instructions on this page. Note: You need to reset your password at least 72 hours / 3 days before the time of the exam.
- If you are not a KI student and do not have a KI account, your teacher will make sure that you can log in to the system
Train using an Inspera demo exam
We have created a simple examination here so you can try out Inspera before you get to the exam hall. Although the aim is to get this as near as possible to a real exam, there are however some differences:
- In the exam hall you will use Safe Exam Browser, not your normal browser. This will stop you from being able to browse freely on the internet.
- In this exam you start ‘already logged in’. On your actual exam you will need to log in with a username and password.
- You will have to submit your actual exam. This button is up to the top-right, where the ‘Restart’ button is in the demo-exam.
- Tortalk will not work (it will in the exam hall)
Please note that the built in speech to text does not appear to work on Safari.
There are two versions of the exam available:
- A navigation where you can freely navigate forwards and backwards
- An examination which only allows navigation forwards (a so-called MEQ exam)
Exam day procedures
On-site examination in an exam hall
When you get to the writing room, you will first be assigned a seat. You will then log into the computer, and then Inspera with your KI username and password. We recommend that if you want to take the test in English, you choose this setting on the log-in page rather than at a later point. You can log in before the examination's start time, but you will not be able to see the questions until the official start time. At the start time, you need to click to start your exam - it does not happen automatically.
When you have finished the examination, it is important that you submit your work and then log out from the computer.
Finding out your grade and eventual comments
You can log into Inspera to get your result using the same information you used to log in in the exam hall.
The information that appears will vary between exams. The course staff will notify you about the information you will be able to see on the page. The available possibilities are that you may be able to see results / grades, any comments, the correct answers and motivation for grades. You will find all these things through the following steps
- Log in to Inspera via ki-digex.inspera.com.
- Under the Archive tab, you should be able to find the exam. Then click on See more details.
- Your grade may be displayed on the following page. There are also three buttons on the page: Show submitted answer, Download and under the heading Feedback there is the third, X information has been commented
- Under Show submitted answers, you see your submitted answers, the correct answers, any comments and annotations
- Under Download you see points per question.
- If the grader has written a comment, there must be a comment under X information has been commented. Some students find it difficult to find comments here in the system. We refer to the following image
- First you have to choose the assignment
- Then click on the notebook icon to open the comment
- ... or the arrow symbol to open notes.
The exam-day interface
Inspera differs only a little from other services during the exam, but there are some helpful features that can be good to keep an eye on.
Flagging
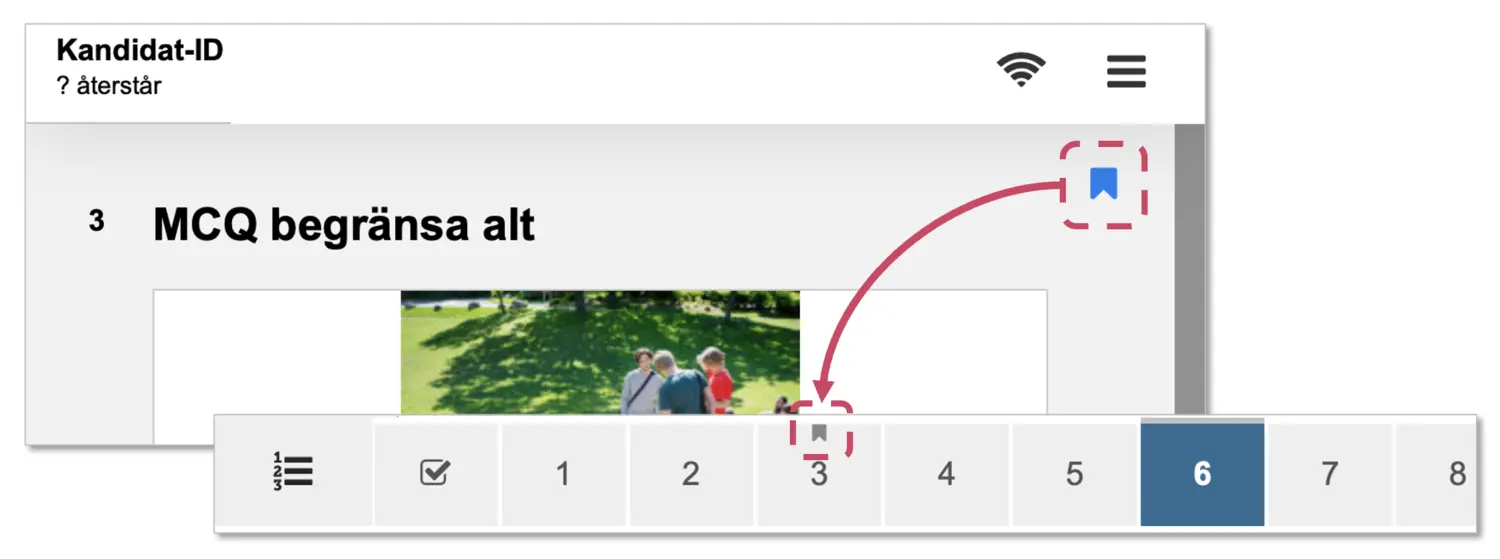
Flagging can be used as a way to remind yourself to look at a question one more time before submission. The function is only available on exams that allow free navigation back and forth. The flag is at the top right of each question, and it will appear that you have flagged questions both in the navigation (at the bottom) and on the overview page that appears just before submitting the exam.
Accessibility
You can customise how Inspera works so it works better for your needs. Some of these adjustments can be made within Inspera , and some of them can be done outside of the system.
The list of tools and features here represents the most commonly used accessibility features in Inspera and is not intended to be an exhaustive list of options. We recommend that you contact the Coordinator for students with disabilities to find out what adaptations are available to you, and that you discuss your needs with the course teacher / examiner to ensure that these functions are activated before the exam.
Unless otherwise stated, these functions can be activated from the menu at the top right of the screen during the exam.
Text-to-speech
There is a built-in text-to-speech feature in Inspera. You can test it in the demo exam. In addition to this built-in function, it is also possible to use the TorTalk tool, which has more functions.
Using Inspera’s text-to-speech tool
The built-in text to speech tool is easy to use, but is quite limited. It will only read up text which is inside the system, that is to say it cannot read text in PDF files or websites which Inspera opens. If you need this feature you should use TorTalk.
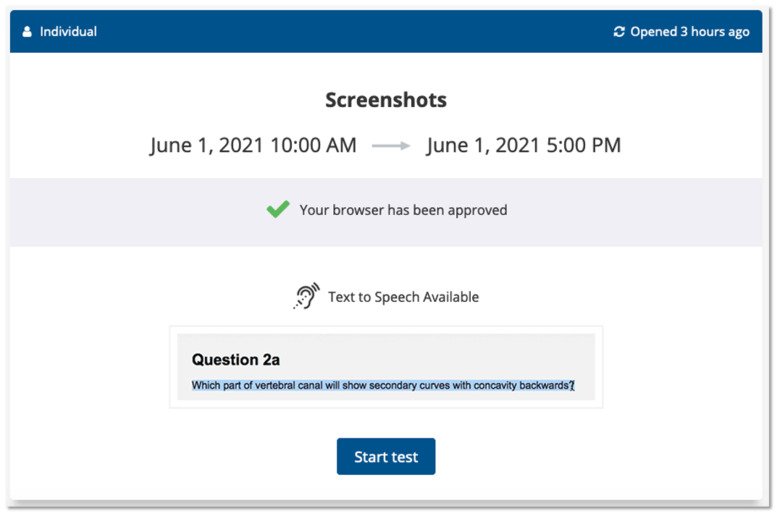
When you log in to the examination, they should see the following picture. Note that there is also an example of what it looks like during an ongoing examination. To use the function, you first activate it using the ≡-menu in the top-right corner of the screen. To use it, you then need to highlight the text, and click on the ▶ (play) button.
Using TorTalk
Tor Talk is a separate text-to-speech tool that offers more than the built-in tool. It is the examiner who decides whether Tor Talk should be available for the examination, and this is also the most common. With Tor Talk, you can have both texts in Inspera and websites and PDF files read aloud. Note that you can only have one type of text read out at a time, e.g. just from a pdf or just from the question in Inspera. If you have selected several text types, Tor Talk will stop reading and the window that shows the pdf or web page will be closed. Just click on it again and you will move on.
Important! There are currently issues with Tortalk and Inspera. It works fine to use the OCR function to read text, or to enable the feature called 'Read up from clipboard', but the 'play' button is not working. In practice, this means you need to:
- Click the gear icon to open settings
- Check 'Read up from clipboard'
- Use copy or Ctrl+C to copy and simultaneously play back the content.
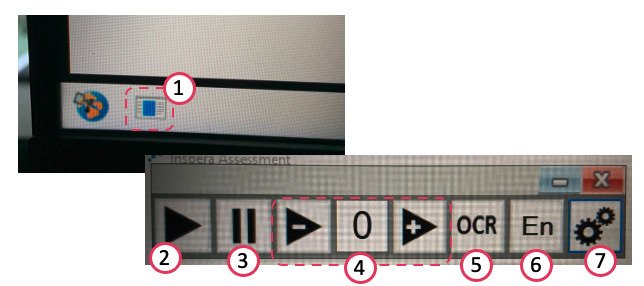
Explanation of the buttons in the pictures above:
- If TorTalk has been added to the examination in Inspera, the symbol for Tor Talk is displayed at the bottom left.
- For TorTalk to play text, select the text (drag it over with the mouse pointer) and then click the ▶ button.
- Pause the reading.
- Adjust the reading speed.
- The OCR function reads out texts in images. It is not 100% reliable. When you click this button, a window opens and the function tries to read out the text in the window.
- Select language and reading voice. Note: the default language is English, but here you can change to Swedish.
- Here you can, among other things, adjust TorTalk's interface.
Adjusting the volume level
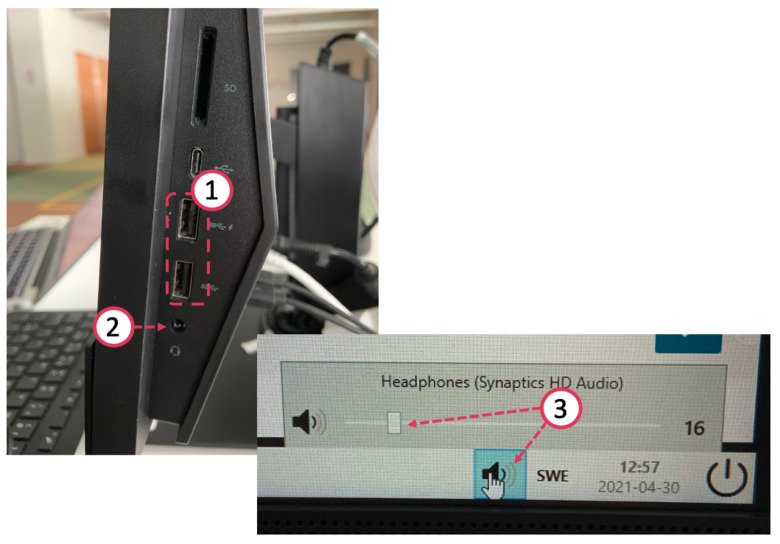
The computers do not have built-in speakers, so headphones must be used to make the text-to-speech services work. In the exam halls there are both USB headphones, and those with a 3.5mm audio jack.
- Here you can connect USB headphones
- You can connect headphones with a 3.5mm plug here
- To adjust the volume, first click on the speaker icon in the menu bar at the bottom right, then adjust with the mouse pointer.
Spellcheck
The spelling checker has been activated if it has been activated by the course personell. When the spell checker is available, there is a small orange dot at the bottom-right of the answer field. This is where you can both check the spelling and change the language.
Here is a simple demonstration where you can try the spell checker.
There are some issues that are good to be aware of:
- The spelling checker only works on questions in essay format (essay questions have a formatting toolbar at the top), but not on other text input based questions with less text.
- Regardless of the exam language, the spelling check is preset to Swedish. It is possible to change the language, of course.

Inverting colours
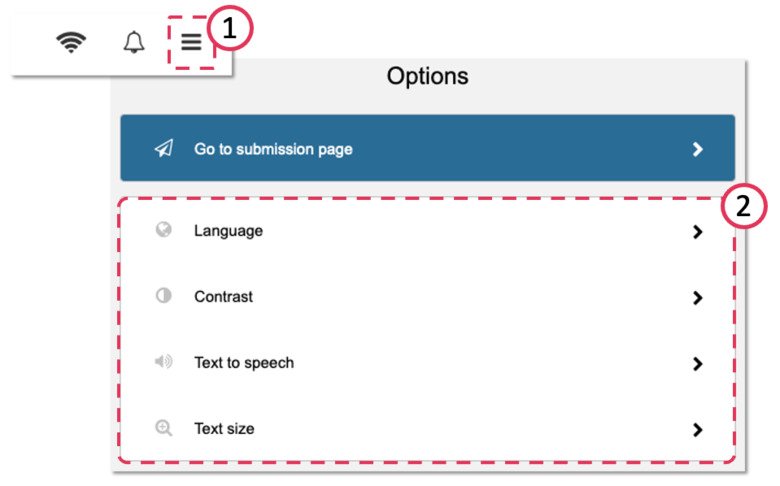
It is also possible to invert the colors of the text, so that the background is black and the text white. You make the setting via the ≡-menu and then Options.
Changing text size
You can choose between three different sizes of text in Inspera. On the computers in the exam halls, it is also possible to zoom with Ctrl +. You make the setting via the ≡-menu and then Options.